Image Map
Showing posts with label teaching ideas. Show all posts

Mini Post-it Rubrics

Thursday, September 17, 2015


This week, I collected a short writing assignment from my students that asked them to create a billboard slogan that summed up key ideas in our One and Only Ivan Novel Study so far. I wanted to quickly grade the assignment with a rating that was more specific than a checkmark at the top of the page.

 The One and Only Ivan

I had a vague memory of something I had seen on Pinterest that showed a piece of copy paper with six sticky notes attached and a brief explanation about running Post-it notes through a printer. I started messing around with 3" x 3" box shapes in a Word document and designed a template for mini rubrics that would print on Post-it notes. I love these rubrics.


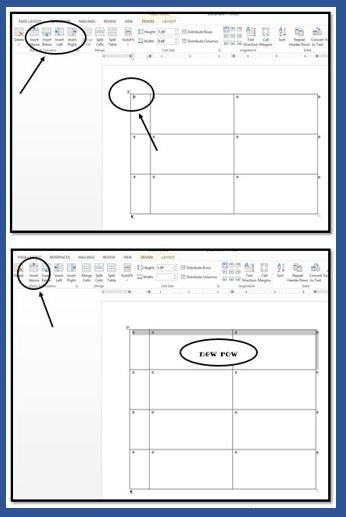
I opened a new Word document and set the margins to .6" on all sides. I inserted a square shape and set the size to 3" x 3". The shape had "no fill" and a black outline. I right clicked on the shape to choose "add text" and typed the line items I needed for the rubric. Once I completed the first rubric, I copied and pasted the box five times for a total of six boxes on the page. I moved the boxes, so I had three rows of two boxes each and printed one copy.

After I had one printed copy of the rubrics, I went back to my Word document and removed the black outline from the edges of each box. On my hard copy of the rubric, I attached six Post-it notes with the adhesive strip along the top edge of each box. To print, I ran the paper through my printer according to the icons for printing in my feed tray. On my printer, the side with the sticky notes is face down, and the sticky edge of each box inserts first. When the paper exits the printer, the finished page is face up.


After my rubrics were finished, I made more Post-its for my son's close reading homework assignment. He needed to add sticky note thoughts while reading the last few chapters of From the Mixed Up Files of Mrs. Basil E. Frankweiler. He codes each of his ideas while he reads, so we created printed Post-its to make his notes neater. He circled the type of comment he was adding and then wrote his thoughts. CLICK HERE for the close reading Post-it template.

OB = observation
OP = opinion
CT = character trait
P = prediction

One drawback to Post-it note printing is removing six individual sticky notes, reattaching fresh notes, and printing again. I needed 35 copies of my mini rubrics and had to run my template five times through the printer. It is a little time consuming. The other drawback (for me) is the smudging I had with my ink jet printer. Since the sticky notes are loose at the bottom, the words did not print cleanly on all parts of each Post-it. I am anxious to try running the page through my laser printer at school.


Happy Grading!

Caitlin

Amazon Book Listing Writing Activity

Sunday, August 30, 2015


My school requires a summer reading assignment for each grade level. In my 4th grade class, students read one required book and three "free choice" books from a list I provide. This year, I asked rising 4th grade students to read The Lemonade War by Jacqueline Davies. I do not like to dwell on the summer reading for too long at the beginning of the year, but I do want students to complete some sort of writing assessment. This year students created a fun Amazon book listing.

First, we looked at actual book listings for favorite books I had read over the summer (hint, hint... generating book recommendations for your students). We identified key features in an Amazon book page and items that seemed to be the same in every book listing.

Students discussed the differences between the book summary at the top of the listing and the book reviews at the bottom of the site page. We noted that the summaries contained more facts and less opinion, but the summaries did try to entice a reader. We also noticed how the summaries did not give away the ending or any surprise twists but created a little bit of a cliff hanger for a potential reader.

Finally, we discussed the "Frequently Bought Together" section in each Amazon listing and the purpose of that feature.

I designed an Amazon-like template and gave the students a copy. Each student completed an Amazon book listing for The Lemonade War that included the title of the book, author, a book level that the students determined like 3rd to 5th grade or 8-11 years old, year published, star rating, summary, and three additional book suggestions.
It is a simple writing activity that could be used for any novel. It incorporates many literature skills like summarizing and identifying important details and main characters. I was also able to sneak some library skills into the assignment by having students look for the year published and choose a reading level for the book. My favorite piece of the assignment is asking students to generate three additional book suggestions that would be good "next reads" to share with classmates.

To download a copy of the Amazon template (and see a few more writing activities for novel studies), CLICK HERE. To purchase a complete Lemonade War novel unit CLICK HERE.

Happy Reading!

Caitlin
TheRoomMom

4 Shortcuts for Creating and Formatting Graphic Organizers

Tuesday, June 9, 2015


I am a table girl. I use them all of the time to create graphic organizers for my class. I like how they provide a framework and direction for the students. After students add information to a graphic organizer, the ideas are sorted and grouped in a way that help students develop generalizations for our units of study, review key concepts, and visualize a big picture.

I use MS Word (I know-- I am in the minority) to build all of my graphic organizers. Since many schools use Word as the primary way to publish documents in the classroom, I thought it might be worth sharing some of my formatting strategies. These are good technology tips for both teachers and students.


The best tip I can give people using MS Word is to turn the formatting button on. This shows all of the background strokes you use while creating a document. None of the background symbols appear when printing, but it allows you to see where you have pressed buttons and what types of spacing you have. If your students have all kinds of funky formatting happening in their school documents, turn the formatting button ON to see all of the times they pressed ENTER!


Next, insert a basic table with the needed numbers of rows and columns. Don't worry if you want to add or delete rows and columns later; it is easy to do. Once you have a basic table in the Word document, you are ready to customize. Most of the functions you will use will be accessed under the LAYOUT tab. This tab is only visible when you have clicked your cursor inside a cell (one of the boxes) on the table.

1. Making the Table Larger


  • To make the table cells (boxes) larger, hover the cursor over the bottom line. When it changes to two parallel lines with an up and down arrow, left click, hold, and drag down. 
  • To move any of the gridlines within the table, hover over the lines you would like to move, wait for the parallel icon with up down arrows to appear, left click, hold, and drag. 


2. Making the Rows and Columns Equal Sizes


  • To distribute rows evenly, highlight all of the rows you would like to be the same height. Select distribute rows in the LAYOUT tab. To distribute columns evenly, highlight all of the columns you would like to be the same width. Select distribute columns. This is where the formatting function comes in handy. There will be a small circle inside each cell. You can see if you have grabbed the cells you need by making sure the little circles in the appropriate boxes are highlighted. 


3. Adding Rows and Columns


  • To insert additional rows or columns, click your cursor in the cell next to where you want to add the row or column. Choose insert above, below, right, or left depending on what you need. 


4. Adding and Formatting Text


  • To add text, click in the cell where you need the text. Type your words (I like to add all words first then work on the formatting). 
  • To change the font, make the size, bigger, center, etc. use the buttons in the HOME tab you use when formatting regular documents. 
  • To change the text direction, highlight the text you want to flip and click the text direction button. Click multiple times until the text is turned the direction you need.


  • To align the text within the cell, click the text symbols that show different line spacing within a box right next to the text direction button. 


Spend some time clicking around in the LAYOUT tab of your document. You can merge and split cells, turn gridlines on and off, and add background colors to each cell, row, or column. You can also click outside of your table and insert clipart pictures. Right click on the picture and choose wrap text/in front of text. After that, you can drag your picture anywhere on your page.

For a printable version of these table tips with step by step instructions and screen shots, visit Creating a Graphic Organizer to download. I also have free printable directions for formatting MS Word essay documents available for free at my TeachersPayTeachers store.

Happy Creating!
Caitlin
TheRoomMom

Those Last Few Weeks...

Friday, May 22, 2015


teacher humor, testing humor, school humor
Teachers, are you trying to survive those last few weeks of school?  Do your students think that learning is 'over' because the test is done?  Are you looking for ideas to improve behavior and keep students engaged?  You've come to the right place.  Here are 4 tips for ending the year like a boss!

  • Just. Keep. Teaching.—The best way to keep your students on task and out of trouble is to run your classroom like you always have.  Stick with your schedule and make sure that the lesson content is keeping your kiddos challenged.  Remember, if you’re a 4th grade teacher, you have a room full of almost 5th graders.  Don’t be afraid to introduce more difficult concepts.  Consider looking at next year’s standards for your subject.  When I told my students we were going to do 6th grade science stuff so they would be ahead next year, they instantly perked up. 
  •  Build Units Around Student Interests—Nothing gives students more buy-in than letting them choose what will be taught.  After our state science test we had a class discussion about what we learned in science this year and made a list of things we still wanted to learn about.  I built units around a few of those topics and my students couldn’t be happier. 
  • Start Fun Friday Afternoons—Make a list of a few fun activities and post it in the room.  These can be academic or creative thinking activities.  For example, you could include a reader’s theater day, owl pellet lab, math-a-thon (online math games), gooey science lab, poetry slam, geography-a-thon (online geography games), and a Greek mythology art project.  Tell students they must earn X points as a class to earn a Fun Friday reward and give points throughout the week.  If they reach the point goal (and they will), choose an activity and enjoy!
5th grade anchor chart, end of the year activities, fun school stuff
  • Teach  Essential Skills—Use these last few weeks to teach something that may have been pushed to the side earlier in the year.  For example, teach cursive, creative writing, or geography.  Oh, and math facts.  Don’t let students leave your grade without knowing their math facts!  Seriously.  You can set them up for success in the next grade if you give them time to master this before the end of the year. 

Summer is almost here.  Finish strong.  I have faith in you.  You can do it!  


--The Pensive Sloth


Poetry Prompts

Sunday, February 8, 2015

This Friday, my fourth graders will participate in the 4th annual Poetry Slam at my school. It is actually something the music teacher and I cooked up a few years ago, so my students have an opportunity to share their favorite original poem with each other and their families. 

Before our school music teacher gets involved, my students study five different figures of speech and create five poems that demonstrate each figure of speech at least one time. Writing poetry can be intimidating for kids, so I break down different poems and types of figures of speech into simple activities to help students create their own poetry.
  • Take an existing poem by a famous author and borrow the structure, repeated words, or style. While reading the novel, HATE THAT CAT, we use the poem, "Love That Boy" by Walter Dean Myers to create an "inspired by" poem.  My students keep the beginning of most of the lines and develop their own simile (so I get to teach simile at the same time). My son is actually in one of my language arts classes this year and his "inspired by" poem made me cry. He does not know I am reprinting his poem here... and sharing it on Facebook... and Tweeting it... and Google+'ing it because I thought it was so sweet.
love that teacher poem
  • I try to match up adjective and adverb grammar lessons with my poetry unit. Give the students an everyday object and ask them to generate a list of adjectives that describe the object. This year, I had my students use one of their shoes as the everyday object. They used a template with blank lines and dropped the adjectives onto the lines and then designed a concrete poem.

  • I have a big list of topics that I cut into little strips and put into an envelope. Each student draws a topic from the envelope. I like to choose topics from nature like a cloud, mountain, tree, flower, sunset, or ocean. The students write five sentences about the object, but each sentence must use personification. We spend some time talking about human traits, and I provide a traits list on their class activity page. The cloud could offer comfort. The mountain could glare down at you. The flower could dance. The students list the five sentences and then move the sentences around a little and edit to create a poem.
personification activity


  • A fun activity I used with my early finishers during our poetry study was book spine poems. You may have seen book spine images floating around on Pinterest. I have a vast classroom library, and the students stacked books to create a poem from the book titles. This year, they took a picture with our class iPads and inserted the image into a PicCollage and added an explanation of their poem. In previous years, students have used MSPublisher to publish their book spine poems.
Poetry can be fun for students and offer a creative way to express feelings students might not share otherwise. I have also started to realize how much poetry enhances all areas of language study and because poems are often short, it provides a great literature alternative when teachers run short on instructional time.

Need some new poetry resources? 

Here are links to great products by our Lesson Deli members:

TheRoomMom's Poetry Unit and Figures of Speech Game (includes activities listed above)

The Owl Spot's Robert Frost Author Study (and other author studies)
Teaching Ideas 4U's Poetry Writing Unit
JB Creations' Revolutionary War Poetry Unit

Happy Writing!

TheRoomMom

'Tis the Season for Writing!

Saturday, December 27, 2014

I admit it.....I enjoy writing with my students! I see it as a chance to have a closer glimpse into their unique personalities. I love to see how they respond to specific prompts...and I love how they listen and critique their peers with their writing as well. Recently, I've tweaked my prompts to reflect the types of writing being asked of students with the revised standards. Incorporating persuasive, expository, and narrative writing with engaging topics makes my writing station flourish! I've recently finished a set of 12 prompts that reflect key holidays and events in December, January, & February. In addition, I developed a simple rubric to assess students' writing and reflect on needed areas of growth. Here is a sample:

I really feel that my students have grown in their writing this year....and it helps me to keep them practicing all the types of writing that they may be asked to do. I hope this gives you ideas on how to stay inspired and tackle writing all year long!

Revolutionary Thinking Maps: Causes of the American Revolution

Thursday, December 25, 2014

I started a series this summer on using Thinking Maps to teach about the American Revolution.  I use thinking maps all the time to help students visually represent content.  You can read the first post HERE on using a brace map to analyze the Declaration of Independence

For today, let's talk about the multi-flow map.  A multi-flow map can be used when something has multiple causes and/or effects.  We use them a LOT in history and science.  For example, last week in science we used a multi-flow map to show the multiple causes on why the wetlands are disappearing.  Here's an example of a multi-flow map showing the causes leading up to the American Revolution.
Next time you are teaching and need a graphic organizer to show multiple causes and/or effects, give the multi-flow map a try!


--The Pensive Sloth

PS--Did you know this makes for a GREAT opinion writing assignment?  Click HERE to learn more!


The Business of Teaching Literature

Sunday, December 14, 2014

My co-teacher and I have a business theme that is the backbone to our 4th grade curriculum. One piece of our academic plan is literature with a business focus. There are many book recommendations (see list below) that portray a main character who gets things going. The character might run a business, be the leader of a project, or become responsible for something significant.

This type of storyline promotes creativity and an entrepreneurial spirit. Many of these books teach students about the basics of business (profit, loss, partnership, etc.). While there is almost always a supportive adult in the story, I like the fact that these books depict children as problem-solvers without a parent or adult handing them the easy solution. 

Chapter Books
Non-Fiction
  • The Day-Glo Brothers by Chris Barton
  • Everyone Wears His Name: A Biography of Levi Strauss by Sondra Henry
  • Model T: How Henry Ford Built a Legend by David Weitzman
  • Chocolate by Hershey: A Story About Milton S. Hershey by Betty Burford
  • Kidpreneurs, Young Entrepeneurs with Big Ideas by Adam Toren and Matthew Toren
  • Growing Money: A Complete Investing Guide for Kids by Gail Karlitz and Debbie Honig
Classroom Ideas
  • Have students write a personal business plan for a company they could start at school. After reading The Lemonade War, my students wrote a business plan for a lemonade stand that we ran during student recess. We used the best ideas from all of the students business plans to create a master plan for the class that we took to our principal. 
  • Do the math. In books like Lunch Money by Clements and The Bread Winner by Whitmore, students can use details in the book to calculate business costs and profits. It is fun to project how much money the characters could potentially earn in a year, two years, or five years.
  • Create a business using advance orders. Film and edit a commercial to share with the school if that technology is available to you. As orders arrive, students use spreadsheets to track and sort orders by class. You can create graphs that show which grades buy the most of a product. This year, my group is selling Mason Jar Cookie Mixes. Not only did we have to record the orders, the students had a ton of recipe math to complete. Our original recipes for the mix made 2 jars. We had to calculate ingredient amounts for 267 jars of cookies mix! I even had the students track down the stores with the best prices (FYI-- Walmart for jars, white chocolate chips, and M&Ms, Costco for the other ingredients in our area).
Books with business provide such rich learning opportunities for students. It makes it so easy to incorporate many layers of skills. What are your best novel studies that give you more bang for your buck?

Happy Reading!

Upper Elementary Holiday Fun--Sequin Ornament Parent Gifts

Monday, December 8, 2014


Growing up, I remember making sequin ornaments with my grandmother.  We would sit at the table for hours and chat while pinning sequins to a foam ball.  A few years ago, I started this tradition in my 5th grade classroom.  The kids had a blast, worked hard, and were proud of their accomplishment when they were done.  They looked forward to giving their gifts to their parents.

We  start our ornaments the last week of school during morning work.  Then, the morning of the last day of school, I put on an audiobook and let the kids spend the morning finishing up.  It takes about 2-4 hours for most students to finish one ornament.  A few finish much faster!  But what I really enjoy is listening to an audiobook during this time.  It’s quite magical.  Students focus intently on creating their pattern and pinning each sequin in place while making meaning in their minds as the story plays.  If you are looking for something quiet, peaceful, and engaging for that last week of school, give sequin ornaments a try!  

There are several tutorials online on how to make sequin ornaments, and lots of options to add ribbon and beads and crystals.   We keep it simple in my classroom.  Sequins and pins.  That's it.  I won't go into detail about how to make the ornaments.  We'll stick with the basics, but with so many tiny sequins and pins...yikes!  You've got to have a system for managing it all.  Here's what has worked for me...

Supplies

*Cups and Plates
*Colorful sequins (medium and large)
*Sequin pins (regular sewing pins are too long, and sequin pins are much cheaper)
*Small Styrofoam balls (Hobby Lobby carries 12 packs--I usually get the 2 1/2 inch SMOOTH Styrofoam balls)
*Ribbon (for hanging ornaments on a tree)

Tips for Making the Ornaments and Managing the Project
  • Have students sketch what they want their ornament to look like before beginning.  There are lots of color options based on what you buy and bring into the classroom.  I typically tell them to stick with 2-3 colors.  You can go with blues and whites for a winter theme, buy some local college colors, school colors, etc.  
  • Making the ornament is actually very simple. Students place a sequin on the ball where they want it to go, then poke a pin through the hole in the sequin to hold it in place.  My rule is that there can be no foam ball showing through.  Also, there is no right or wrong way to place a sequin.  You can have the concave side face the ball or face away from the ball, or do a little of both. 
  • Teach students to use the the eraser of the pencil to push pins in.  Their fingers get tired and sore after awhile.  This project will help students develop perseverance!  I love how proud they are when they finally finish. 
  • Keep a magnet handy.  Someone will spill pins and sequins all over the floor.  Every year there are a few spills.  Have students use a magnet to collect the pins before going after the sequins.  
  • Students should wear shoes.  If you are one of those teachers who lets kids take off their shoes, avoid doing so until this project is over and the floors have been vacuumed. 
  • This project is geared towards 5th grade and up and costs about $2 per student.     
  • Give students only a pinch of pins and sequins at a time and have them come back to you for more.  Counting pins and sequins is impossible, so I keep the supplies near me and refill cups as needed.  
  • When students finish, they use a magnet to collect pins and bring them back to me.  Then, I have them sort their sequins and place them back with the correct colors. 
***Also, to help manage the project I use 2 clear plastic cups per child, some masking tape, and a paper plate. I've re-used the cups and plates for years since all they do is hold supplies while students work for a few days.  I write names on the cups with permanent markers and scribble them out for next year's kids. 


When working with pins, safety comes first and each student has his/her own cup to hold the pins and sequins.  Sequin pins aren't especially sharp, but we are still very cautious.  We discuss being careful and reporting injuries before we begin, and students are not allowed to share supplies.  I also model carefully reaching into the cup to pick up pins instead of shoving your hand in and getting poked.  I've never had a problem!  

1--Top view of cup showing pins and sequins. 
2--Each child has two cups.  The supply cup and the ornament cup. 
3--Because this is an ongoing project, when not in use, cups can be stacked so that the sequins and pins are contained in case a cup is knocked over.  I use masking or painters tape to hold the cups together because it stays sticky as the students open and close it each day.
4--Here's a cup turned upside down. A few sequins came out, but the rest stays in. 
5--Students like to dump a few pins and sequins onto a paper plate for easy access while working. 


That's all for now.  Happy holidays and  happy crafting!

--The Pensive Sloth 
thepensivesloth.com
pensivesloth@gmail.com