Image Map

Christmas in July Sale

Sunday, July 12, 2015

 Stop by Simone's Math Resources on July 13 and 14 for a great sale.
https://www.teacherspayteachers.com/Store/Simone

There will be four super deals listed in the featured items section. These bundles will be on sale for 50% off of their original value.

The rest of the store will be on sale for 20% off.

This is a great time to stock up for the upcoming school year.

How to Make a Teacher Desk Organizer

Wednesday, July 1, 2015


Okay, so for those of you who read my blog, you know I really can't resist trying these really crafty teacher ideas.  I may be late to the party, but I saw a few of the desk organizers made out of the small gray plastic toolboxes and thought they would be awesome!  I am toying with ditching a traditional desk this year, and was wondering where I would store all that junk that gets lost in a desk.  Also, my home "office" is a kitchen nook, and you don't even want to know how junked up the counters and drawers get.  I thought this desk organizer might be the answer to my prayers.

How To
First, take a trip to the hardware store.  You need the toolkit and spray paint made for plastic.  Although the paint said no sanding, I still sanded just in case.  Couldn't hurt, right?

Tip:  If you are not a good painter or are new to spray painting, spray painting outside in the wind is
NOT a good idea.  Don't be so anxious to get it done that you have to buy twice the amount of paint!

I decided I wanted to paint my drawers as well, but that is completely not necessary.  It does make some of the drawers stick a bit, but with use the paint on the tracks will wear off.

Allow the paint to dry completely.  Again, patience.  Wait!

Once the paint dries, you just assemble it.  Since I painted my drawers, I Mod Podged my labels on.  If you leave the drawers clear, then you can attach the labels inside the drawers.

Once you have your labels on, you are all set.  Now you get to the fun part - cleaning up your clutter!  (Okay, for me, there is just this great sense of relief when I clear up a bunch of clutter that has been bugging me.  Anyone else?)  It is just amazing how much you can fit in these!  They do make other sizes of the toolboxes as well, but I
felt like this one would be enough.  If I taught primary, I might want more drawers - I don't use a lot of stickers and things on a regular basis.

If you like my labels, I made them with Cherry Workshop's Summer Backgrounds Stained Glass Digital Paper and KB3's AlphaBasicSans font.  Both can be found on TeachersPayTeachers.

What is your best classroom organization tip?

Amy

4 Shortcuts for Creating and Formatting Graphic Organizers

Tuesday, June 9, 2015


I am a table girl. I use them all of the time to create graphic organizers for my class. I like how they provide a framework and direction for the students. After students add information to a graphic organizer, the ideas are sorted and grouped in a way that help students develop generalizations for our units of study, review key concepts, and visualize a big picture.

I use MS Word (I know-- I am in the minority) to build all of my graphic organizers. Since many schools use Word as the primary way to publish documents in the classroom, I thought it might be worth sharing some of my formatting strategies. These are good technology tips for both teachers and students.


The best tip I can give people using MS Word is to turn the formatting button on. This shows all of the background strokes you use while creating a document. None of the background symbols appear when printing, but it allows you to see where you have pressed buttons and what types of spacing you have. If your students have all kinds of funky formatting happening in their school documents, turn the formatting button ON to see all of the times they pressed ENTER!


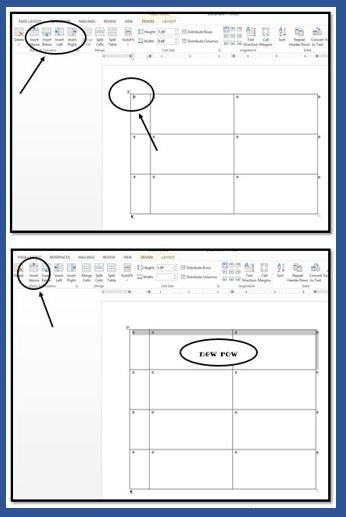
Next, insert a basic table with the needed numbers of rows and columns. Don't worry if you want to add or delete rows and columns later; it is easy to do. Once you have a basic table in the Word document, you are ready to customize. Most of the functions you will use will be accessed under the LAYOUT tab. This tab is only visible when you have clicked your cursor inside a cell (one of the boxes) on the table.

1. Making the Table Larger


  • To make the table cells (boxes) larger, hover the cursor over the bottom line. When it changes to two parallel lines with an up and down arrow, left click, hold, and drag down. 
  • To move any of the gridlines within the table, hover over the lines you would like to move, wait for the parallel icon with up down arrows to appear, left click, hold, and drag. 


2. Making the Rows and Columns Equal Sizes


  • To distribute rows evenly, highlight all of the rows you would like to be the same height. Select distribute rows in the LAYOUT tab. To distribute columns evenly, highlight all of the columns you would like to be the same width. Select distribute columns. This is where the formatting function comes in handy. There will be a small circle inside each cell. You can see if you have grabbed the cells you need by making sure the little circles in the appropriate boxes are highlighted. 


3. Adding Rows and Columns


  • To insert additional rows or columns, click your cursor in the cell next to where you want to add the row or column. Choose insert above, below, right, or left depending on what you need. 


4. Adding and Formatting Text


  • To add text, click in the cell where you need the text. Type your words (I like to add all words first then work on the formatting). 
  • To change the font, make the size, bigger, center, etc. use the buttons in the HOME tab you use when formatting regular documents. 
  • To change the text direction, highlight the text you want to flip and click the text direction button. Click multiple times until the text is turned the direction you need.


  • To align the text within the cell, click the text symbols that show different line spacing within a box right next to the text direction button. 


Spend some time clicking around in the LAYOUT tab of your document. You can merge and split cells, turn gridlines on and off, and add background colors to each cell, row, or column. You can also click outside of your table and insert clipart pictures. Right click on the picture and choose wrap text/in front of text. After that, you can drag your picture anywhere on your page.

For a printable version of these table tips with step by step instructions and screen shots, visit Creating a Graphic Organizer to download. I also have free printable directions for formatting MS Word essay documents available for free at my TeachersPayTeachers store.

Happy Creating!
Caitlin
TheRoomMom

Summer Reading Reminders

Thursday, June 4, 2015

In recent weeks, I have been reading many posts about getting students interested in reading over the summer. This is a hot topic for me because I am always pushing more reading for pleasure with students. My own children have already made two trips to the bookstore since we finished school, and we may have to go again today. My son finished reading all three books in the Land of Stories series by Colfer, and my daughter read the first Emily Windsnap by Kessler and is looking for the sequel.

I think many of us employ the same tricks to keep children reading during non-school months. Here are three suggestions I have to keep reading alive. What are ways you encourage reading during June, July, and August?

  • Generate a large list to send with your students over the summer. My school has required summer reading, and each grade level has an approved list of books. The list for my grade level is multiple pages, sorted by genre, and includes a wide variety of reading levels. I also add an asterisk to my favorite books, so students have a place to start if the list seems overwhelming. Recommending specific books is often more successful than saying, "Go read something."
  • If your school has required summer reading, keep any related assignments light. I ask students to keep a chart with the title and author and also complete a brief comprehension bookmark with notes while reading (pictured at the top). No big book reports. If assignments related to summer reading are too long, students treat reading like a chore rather than a treat. If you need help creating a summer reading assignment and book list for students, THIS ONE can help you get started.
  • Get involved in a reading incentive program. Our local library has a summer reading challenge. Students complete a chart based on minutes read. Local businesses and organizations donate free coupons, so students can earn tickets to a minor league baseball game, free frozen yogurt, complimentary karate class at a local karate school, etc. Barnes and Noble has a similar reading program. Children complete a reading journal as they finish reading books. When the journal is complete, bring it to a local Barnes and Noble to redeem for a free book. Our librarian sent a copy of the reading journal home with each student in the final take home packet of the year.

If you are looking for summer reading ideas for upper elementary students, here are a few books on my list:
  • The Fourteenth Goldfish by Jennifer Holm
  • Savvy by Ingrid Law
  • The Penderwicks by Jeanne Birdsall
  • Under the Egg by Laura Max Fitzgerald
  • Graceful by Wendy Mass
  • The False Prince by Jennifer A. Nielsen
  • Rain Reign by Ann M. Martin
  • Greenglass House by Kate Milford

Happy Reading and Happy Summer!
Caitlin (TheRoomMom)

Those Last Few Weeks...

Friday, May 22, 2015


teacher humor, testing humor, school humor
Teachers, are you trying to survive those last few weeks of school?  Do your students think that learning is 'over' because the test is done?  Are you looking for ideas to improve behavior and keep students engaged?  You've come to the right place.  Here are 4 tips for ending the year like a boss!

  • Just. Keep. Teaching.—The best way to keep your students on task and out of trouble is to run your classroom like you always have.  Stick with your schedule and make sure that the lesson content is keeping your kiddos challenged.  Remember, if you’re a 4th grade teacher, you have a room full of almost 5th graders.  Don’t be afraid to introduce more difficult concepts.  Consider looking at next year’s standards for your subject.  When I told my students we were going to do 6th grade science stuff so they would be ahead next year, they instantly perked up. 
  •  Build Units Around Student Interests—Nothing gives students more buy-in than letting them choose what will be taught.  After our state science test we had a class discussion about what we learned in science this year and made a list of things we still wanted to learn about.  I built units around a few of those topics and my students couldn’t be happier. 
  • Start Fun Friday Afternoons—Make a list of a few fun activities and post it in the room.  These can be academic or creative thinking activities.  For example, you could include a reader’s theater day, owl pellet lab, math-a-thon (online math games), gooey science lab, poetry slam, geography-a-thon (online geography games), and a Greek mythology art project.  Tell students they must earn X points as a class to earn a Fun Friday reward and give points throughout the week.  If they reach the point goal (and they will), choose an activity and enjoy!
5th grade anchor chart, end of the year activities, fun school stuff
  • Teach  Essential Skills—Use these last few weeks to teach something that may have been pushed to the side earlier in the year.  For example, teach cursive, creative writing, or geography.  Oh, and math facts.  Don’t let students leave your grade without knowing their math facts!  Seriously.  You can set them up for success in the next grade if you give them time to master this before the end of the year. 

Summer is almost here.  Finish strong.  I have faith in you.  You can do it!  


--The Pensive Sloth


'Twas the Night Before Testing...Student Treat Idea

Tuesday, March 10, 2015


The day before the big test, I gather my students on the rug give them a pep talk.  Not a "you better do this" kind of pep talk, but an "I'm proud of you, you've worked hard, you've got this" kind of pep talk.  I don't want them stressed.  I want them confident in their abilities and relaxed.  I tell them that they have important homework tonight--to go outside and play, eat dinner, and get some rest.  At the end of our chat, I give each kiddo a treat.  This year, I placed a small plastic diamond in each of their hands and told each one to "Shine bright like a diamond."  They laughed because it's cheesy, I know, but they loved it and were so excited when they got THEIR diamond.  It was a fun, and hopefully memorable, experience letting them know that I believe in them and know they will do their best. 

test prep, student treats, 5th grade, STAAR, PARCC, FSA

NOTE:  Ring Pops work well for this, but in Texas we aren't allowed to give out candy during the school day, which is why I chose the plastic diamonds instead.  They sell the little gems at Party City as a table decoration for wedding showers.  I bought the jumbo bag that probably has 300 or so diamonds, so I'm set for the next several years!

Looking for simple ideas to help your students succeed on your state reading test?  Click HERE to read my top 11 reading test-prep tips. 

Thanks for stopping by!

--The Pensive Sloth
pensivesloth@gmail.com

Teach History with Me: 5 Ideas for Teaching the Civil War

Teach History With Me Blog Series from The Pensive Sloth for Teaching 5th and 6th Grade History

Get your upper elementary students excited about history!  Here are five ideas for teaching your 5th through 8th grade students about the Civil War.

1.  A Nation Divided--Help students understand the causes behind the war by comparing how the north and south developed very different economies and ways of life.  I like to have students make a giant division sign in their social studies notebooks and describe northern was of life in the top bubble and southern ways of life in the bottom bubble.
civil war anchor chart, 5th grade history, 6th grade history, middle school history, teaching social studies, history graphic organizer

2.  "Bull Run" Read-Aloud--To squeeze in a little literature, I read the novel "Bull Run" by Paul Fleischman aloud to the class.  It is written from the perspective of different characters in the north and the south, and the reader has to piece together the story as each character tells their part, all leading up to the battle at Bull Run.  I'll be honest, it's a challenging book, which is why I do it as a read-aloud.  To help students (and me) remember who the characters are, we make a chart of who's who to refer to as we read.
civil war anchor chart, 5th grade history, 6th grade history, Bull Run novel activities, teaching about the civil war, middle school history, social studies lessons, integrating reading in social studies

3.  Goober Peas Song--Exposing students to music from different eras can be lots of fun.  The son, Goober Peas, is a traditional folk song that Confederate soldiers would sing.  It gives students a glimpse of what life was like for soldiers during this time period.  Limited food supply, being away from family, boredom, and lots of sitting around waiting for battles.  Play the song, give students copies of the lyrics, and discuss what can be inferred about a soldier's life during the Civil War.  A quick Google search brings up several YouTube videos for students to enjoy. They always grumble and giggle at first, but the song has a catchy chorus and after introducing it, I hear the chorus all year long!

4.  Underground Railroad Interactive Journey--If you haven't seen Scholastic's interactive journey on the Underground Railroad, you must!  Students explore the life of slaves on plantations and travel the treacherous journey towards freedom in the north.  There are wonderful photos, descriptions, and a few audio clips to engage students along the way.  When they finish, I have them write a diary entry as a slave who escaped to freedom on the Underground Railroad.
http://teacher.scholastic.com/activities/bhistory/underground_railroad/

5.  Make a Civil War Museum Exhibit PBL--I like to end the Civil War unit with a hands-on project.  Students choose a topic related to the Civil War, do some research, and construct a museum exhibit.  Then, invite students from other classrooms to come to 'The Museum" and interact.  Students love having an audience, and knowing that someone other than the teacher will be interacting with their work can be a powerful motivator.  I've included a freebie with a list of possible topics and guiding questions below.  Click the image for a PDF of this handout.
https://drive.google.com/open?id=0B-obN9nOM-8GZmEtZnlqZHJUVGc&authuser=0

Hey upper elementary and middle school social studies teachers, looking for more ideas to make history fun?  I'm starting a blog series called Teach History with Me.  Here's the first post on World War I and the Christmas Truce.  More posts coming soon!

 --The Pensive Sloth

http://thepensivesloth.com/